站內搜尋:Yahoo搜尋的結果,如果沒有給完整的網址,請在站內再搜尋一次!

顯示具有 Python 標籤的文章。 顯示所有文章

2025-02-03

如何使用 Python 從字型檔中提取文字,並將指定文字儲存為 SVG 檔案?

測試使用Gemini及Copilot回答「如何使用 Python 從字型檔中提取文字,並將指定文字儲存為 SVG 檔案?」

  • Gemini提供較完整的說明:
https://g.co/gemini/share/9f25ce6bc6a9

以下是如何使用 Python 從字型檔中提取文字,並將指定文字儲存為 SVG 檔案的步驟:

  1. 安裝必要的函式庫
    首先,你需要安裝 fonttools 和 svgwrite 這兩個函式庫。你可以使用 pip 來安裝它們:
    Bash
    pip install fonttools svgwrite

  2. 匯入函式庫
    在你的 Python 腳本中,匯入必要的函式庫:
    from fontTools.ttLib import TTFont
    import svgwrite

  3. 開啟字型檔
    使用 fontTools 開啟你的字型檔:
    font = TTFont("path/to/your/font.ttf")
    請將 "path/to/your/font.ttf" 替換為你字型檔的實際路徑。

  4. 提取字元
    從字型檔中提取你想要的字元。你可以使用 font.getGlyphNames() 來獲取所有字元的名稱,然後根據你的需求選擇特定的字元。
    glyph_names = font.getGlyphNames()
    selected_glyphs = [name for name in glyph_names if name.startswith("uni")]
    # 例如,選擇所有 Unicode 字元

  5. 建立 SVG 檔案
    使用 svgwrite 建立一個新的 SVG 檔案:
    dwg = svgwrite.Drawing("output.svg", profile='full')

  6. 將文字轉換為 SVG 元素
    對於每個選定的字元,將其轉換為 SVG 路徑元素,並添加到 SVG 檔案中。
    for glyph_name in selected_glyphs:
        glyph = font["glyf"][glyph_name]
        path = glyph.getOutline()
        dwg.add(dwg.path(d=path, fill="black"))

  7. 儲存 SVG 檔案
    最後,儲存你的 SVG 檔案:
    dwg.save()

    完整程式碼範例
    from fontTools.ttLib import TTFont
    import svgwrite

    font = TTFont("path/to/your/font.ttf")

    glyph_names = font.getGlyphNames()
    selected_glyphs = [name for name in glyph_names if name.startswith("uni")]

    dwg = svgwrite.Drawing("output.svg", profile='full')

    for glyph_name in selected_glyphs:
        glyph = font["glyf"][glyph_name]
        path = glyph.getOutline()
        dwg.add(dwg.path(d=path, fill="black"))

    dwg.save()
注意事項
請確保你安裝了必要的函式庫。
替換程式碼中的字型檔路徑為你的實際路徑。
你可以根據需要調整程式碼,例如選擇不同的字元、設定 SVG 樣式等。
這個範例程式碼將會把字型檔中所有以 "uni" 開頭的字元轉換為 SVG 路徑,並儲存到 output.svg 檔案中。你可以根據你的需求修改 selected_glyphs 變數來選擇特定的字元。


  • Copilot提供較簡要的範例
你可以使用 Python 和一些庫來從字型檔中提取文字,並將指定的文字存成一個 SVG 檔。以下是步驟:

安裝所需的庫:
bash
pip install svgwrite fonttools

使用以下程式碼:
import svgwrite
from fontTools.ttLib import TTFont

# 載入字型檔
font = TTFont('path/to/your/font.ttf')

# 指定文字
text = "Hello, World!"

# 創建 SVG 檔
dwg = svgwrite.Drawing('output.svg', profile='tiny')

# 設定文字屬性
dwg.add(dwg.text(text, insert=(0, 20), font_family='YourFontFamily', font_size=20))

# 儲存 SVG 檔
dwg.save()

請確保將 path/to/your/font.ttf 替換為你的字型檔路徑,並將 YourFontFamily 替換為字型檔中的字型名稱。


2021-09-20

Python : 安裝 pyqt5-tools 取得 PyQt5的 UI 介面設計工具 designer.exe

 習慣使用PyCharm 管理Python套件模組的虛擬環境,一個專案就建立一個虛擬環境,對專案而言,簡單又簡化。

安裝PyQt5時,並沒有模組關聯將pyqt5-tools一 倂安裝,因此要使用designer.exe來輔助設計UI介面時,會找不到designer.exe,因此要安裝一下pyqt5-tools (PyQt5 Designer and QML plugins)。

安裝後可以在以下位置找到designer.exe:

專案目錄位置的\venv\Lib\site-packages\qt5_applications\Qt\bin


2021-09-17

使用Kivy開發Python GUI的中文顯示、輸入...

# import kivy
import os
from kivy.app import App
from kivy.core.text import LabelBase
from kivy.resources import resource_add_path
from kivy.uix.button import Button
from kivy.uix.label import Label
from kivy.uix.textinput import TextInput

# https://source.typekit.com/source-han-serif/tw/
# https://github.com/adobe-fonts/source-han-sans
# https://github.com/googlefonts/noto-cjk
# 引用字體檔案
resource_add_path(os.path.abspath('NotoSerifCJK-Light.ttc'))
# 將kivy預設的字體替換成指定的中文字體
LabelBase.register('Roboto', 'NotoSerifCJK-Light.ttc')


class MyApp(App):
    def build(self):
        return Label(text="你好!中文測試。\nHello World", font_size=72)
        # return Button(text="按鈕", font_size=36)
        # return TextInput()


if __name__ == "__main__":
    MyApp().run()


2021-07-07

如何在JupyterNotebook中安裝python套件?

在程式碼編輯Cell 中輸入指令,在指令前面加上「!」作為開頭,這段文字就會被當作是對作業系統下達命令提示字元的指令。

所以要在Jupyter Notebook中安裝套件,可以輸入「!pip install 套件名稱」或「!conda install 套件名稱」,再執行這段指令就可以了。


修改Anaconda中的Jupyter Notebook預設工作目錄

我使用的Jupyter Notebook是安裝Anaconda時,一併提供的功能。Jupyter Notebook預設的工作目錄是登入者的個人工作目錄,例如:C:\Users\使用者代號

更改Jupyter Notebook預設工作目錄的作法:

  1. 進入Anaconda Prompt (命令提示字元)
  2. 執行 jupyter notebook --generate-config
    設定檔會產生在 C:\Users\使用者代號\.jupyter\jupyter_notebook_config.py
  3. 編輯設定檔jupyter_notebook_config.py
  4. 找到 #c.NotebookApp.notebook_dir = '' 這一行
    拿掉#號,填入預設要開啟的位置,例如:D:\myWorks\HanniDocs\pgmSpaces\pyWorks\jupyter
  5. 修改啟動Jupyter Notebook的捷徑內容
  6. 拿掉 目標(T)  內容中的  "%USERPROFILE%/"
    只留下 C:\ProgramData\Anaconda3\python.exe C:\ProgramData\Anaconda3\cwp.py C:\ProgramData\Anaconda3 C:\ProgramData\Anaconda3\python.exe C:\ProgramData\Anaconda3\Scripts\jupyter-notebook-script.py
  7. 重新執行Jupyter Notebook捷徑,就可以將工作目錄正確的導向指定的位置。


2021-07-05

在終端機命令模式下,使用 http.server 模組,啟動簡易的HTTP伺服器,供程式開發測試 (Python 3.x)

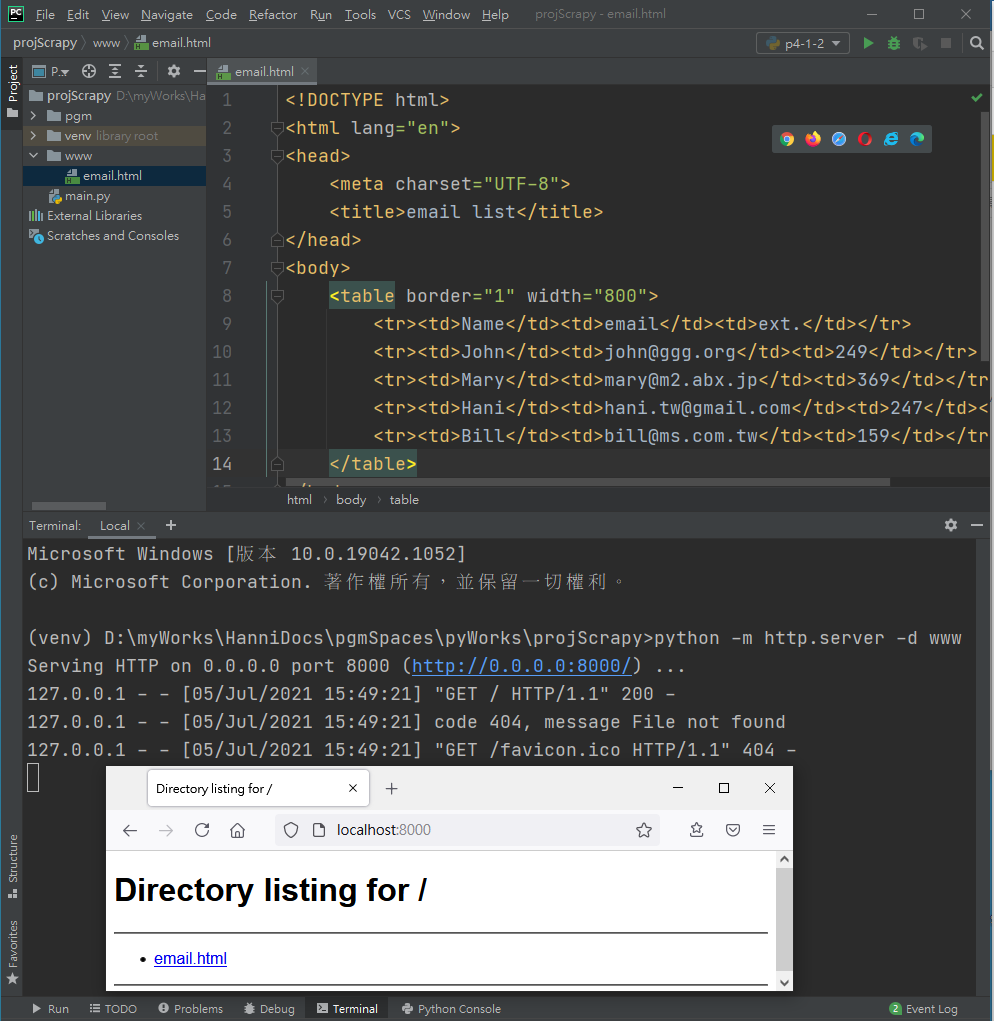
 以下擷圖,是使用PyCharm編寫python程式,在Terminal視窗啟動http.server ...

projScray專案,建立Python虛擬環境,相關的套件放在venv資料夾下

在專案目錄下,建立一個www目錄,存放供存取的html等相關檔案

啟動 http.server 的指令  

  • python -m http.server -d www  (擷圖使用這個指令)
  • python -m http.server 8088 -d www -b 10.1.1.22
    • port : 可以依需求在http.server後面指定port,例如:8088,不指定預設為8000
    • 用-d 指定存放網頁檔案的目錄,例如:www
    • 用-b 指定IP,預設使用http://localhost:8000/訪問網頁


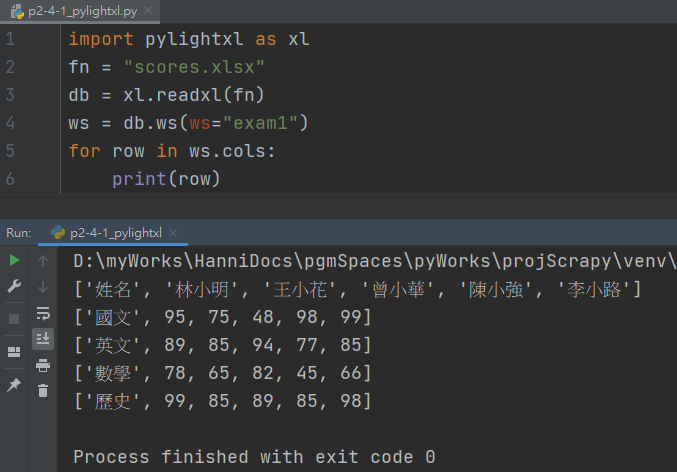
用Python讀取Excel檔,已經安裝xlrd,但出現xlrd.biffh.XLRDError: Excel xlsx file; not supported錯誤訊息

 用Python讀取Excel檔,已經安裝xlrd,但出現xlrd.biffh.XLRDError: Excel xlsx file; not supported錯誤訊息,從Excel xlsx file; not supported看來,應該是xlrd不支援xls的檔案格式了...


我安裝的版本是 xlrd 2.0.1

https://pypi.org/project/xlrd/一探究竟?

  • xlrd 1.2.0 Release history: 
    Extract data from Excel spreadsheets (.xls and .xlsx, versions 2.0 onwards) on any platform. Pure Python (2.7, 3.4+). Strong support for Excel dates. Unicode-aware.
    看這個較舊的版本是有支援讀取xlsx格式的,降低版本安裝是一個解決方案。
    pip install xlrd==1.2.0
  • xlrd 2.0.0 Release history: 
    Read Excel spreadsheets from .xls files.Pure Python (2.7, 3.6+).
    啊!原來是2.0.0起,只支援.xls格式
  • xlrd 2.0.1 Project description :
    xlrd is a library for reading data and formatting information from Excel files in the historical .xls format.
    This library will no longer read anything other than .xls files. For alternatives that read newer file formats, please see http://www.python-excel.org/.
到 http://www.python-excel.org/ (Working with Excel Files in Python) 看一下囉!

可以支援python讀取xlsx的套件(package),還是有的:openpyxl, pylightxl ...

2021-03-04

在 PyCharm 的 虛擬環境下(venv)成功安裝twstock但出現 ModuleNotFoundError: No module named 'lxml' 的錯誤訊息

 在 PyCharm 的 虛擬環境下(venv)成功安裝twstock
但出現 ModuleNotFoundError: No module named 'lxml' 的錯誤訊息

在PyCharm 下 補安裝 lxml :
File → Setting → 在Project : (project name) 下 → Python Interpreter 下, 安裝 lxml

切換到Terminal視窗(Alt + F12),試 run 一下:
(venv) C:\User\User\pyWorkd\PycharmProjects\twStock>twstock -U
strat to Update codes
Done!

確認OK了!!!

2021-01-26

Python程式碼:如何計算兩個正整數的最大公因數及最小公倍數?

  1.  最大公因數(highest common factor, hcf),也稱為最大公約數(greatest common divisor, gcd),詳細定義內容,可參閱:https://zh.wikipedia.org/wiki/最大公因數 
  2. 最小公倍數(least common multiple, lcm),詳細定義內容,可參閱:https://zh.wikipedia.org/wiki/最小公倍數 
  3. 輾轉相除法,又稱歐幾里德計算法(Euclidean algorithm),是求最大公因數的計算方法,詳細定義內容,可參閱:https://zh.wikipedia.org/wiki/輾轉相除法 
    把輾轉相除法定義為程式函式,可以用迴圈或遞迴的方式進行,可參閱以下程式碼。
  4. 兩個正整數相乘等於該兩數的最小公倍數乘上最大公因數,所以取得最大公因數後,就可以計算取得最小公倍數。

2021-01-10

Python 程式碼 : 整數因數分解(integer factorization)(質因數分解prime factorization)

  1.  一個整數的質因數一定不會大於該整數。
  2. 建立該整數的所有可能質因數列表
    • 建立一個檢測質數的函式 (chkPrime)
    • 使用質數函式找出小於等於該整數的質因數列表(getPrimeList)
  3. 使用質因數列表找出該整數的所有因數列表(getFactorList)
  4. 改善空間:
    • chkPrime中,2已列入質數,其餘的偶數,不用再測試,一定不是質數
      for i in range(2, n): 可以改成 for i in range(3, n, 2):
    • 如果質因數只有一個,這個整數就是質數,不須再分解計算了。
    • 可質因數分解的整數,不會存在超過該整數一半以上的質因數,
      所以供測試的質因數清單可以再簡化。
    • ... 


2020-12-30

設定 PyCharm 的 External Tools

在使用PyCharm編輯開發python GUI 程式碼的過程,如果是搭配QtDesigner開發介面,可以在PyCharm開啟、新增ui檔,將ui轉換為py檔,一件很方便的事,紀錄一下這些參數。

  • 開啟新增external tools的頁面
    File → Setting (開啟Setting 頁面)
    Tools → External Tools → + (開啟Create Tool 頁面)
  • 以下將紀錄使用 QtDesigner 新增表單、編輯指定ui表單、將 ui 轉換為 py
    1. 新增QtDesigner表單:
      1. Name : QtDesigner(NewForm)
      2. Group : External Tools
      3. Program : /usr/lib/x86_64-linux-gnu/qt5/bin/designer
      4. Arguments : (空白)
      5. Working directory : $ProjectFileDir$/$FileDirRelativeToProjectRoot$
    2. 編輯QtDesigner表單:
      1. Name : QtDesigner(EditForm)
      2. Group : External Tools
      3. Program : /usr/lib/x86_64-linux-gnu/qt5/bin/designer
      4. Arguments : $FileName$
      5. Working directory : $ProjectFileDir$/$FileDirRelativeToProjectRoot$
    3. 將ui檔轉換為py檔:
      1. Name : PyUIC5(ui->py)
      2. Group : External Tools
      3. Program : /usr//bin/pyuic5
      4. Arguments : $FileName$ -o Ui_$FileNameWithoutExtension$.py
      5. Working directory : $ProjectFileDir$/$FileDirRelativeToProjectRoot$


2020-12-25

如何在Linux Ubuntu Desktop安裝Qt Designer,用來設計python GUI使用者介面程式

ubuntu的版本:20.04.1 (LTS) 1. 確認python3已可以work

2. 安裝PyQt5
sudo apt-get install python3-pyqt5

3. 安裝Qt Designer
sudo apt-get install qttools5-dev-tools
sudo apt-get install qttools5-dev

4. 啟動Qt Designer
cd /usr/lib/x86_64-linux-gnu/qt5/bin
./designer

5. 將透過Qt Designer設計的ui檔,轉換匯出為py檔
pyuic5 /home/userid/workfolder/helloworld.ui -o helloworld.py

如果出現 Command 'pyuic5' not found, but can be installed with:
可以使用以下指令安裝pyuic5 sudo apt install pyqt5-dev-tools

2019-09-02

SQLite : Python開發環境下,使用SQLite的參數化查詢,可以避免因包含 ' 單引號(apostrophe)的字串,所引起的錯誤

  1. 使用Python的 % 串接字串,很好用,很方便,但如果字串中包含單引號 (apostrophe, ASCII : 39),又沒有預先處理好,就會造成SQL執行錯誤,例如:
    zSQL="""INSERT INTO logs
                    (logA,logB,logC,logD,logE,logF) values (
                    '%s','%s',%d,%d,%d,'%s');
            """
    SQL=zSQL%(strA,strB,strC,strD,strE,strF)
  2. 如果直接改成參數化的語法,這樣就可以自動排除單引號 (apostrophe, ASCII : 39)所引起的錯誤。
  3. oConn.execute("INSERT INTO logs (logA,logB,logC,logD,logE,logF) values (?,?,?,?,?,?), (strA,strB,strC,strD,strE,strF))"
  1. 參考資料:https://zh.wikipedia.org/wiki/參數化查詢


2019-08-24

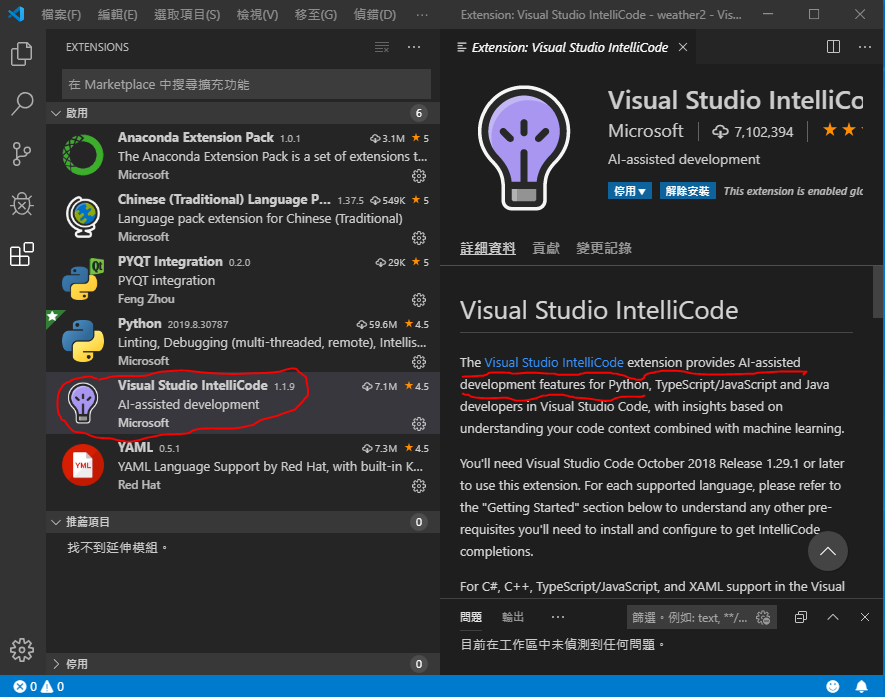
VS Code : 用Visual Studio IntelliCode取代 Jedi 來當 IntelliSense engine

  1. 安裝 Visual Studio IntelliCode
  2. 設定VS Code 的 IntelliSense Engine
    搜尋方塊,輸入:Python Intelli
    選取:Vsintellicode > Python : Completions Enabled
    取消:Python : Jedi Enabled
    根據提示訊息Reload language engine

  3. 使用VS IntelliCode 當 IntelliSense Engine的妙用:
    Jedi無法正常解析,類別內self所延伸的屬性、方法、控制項名稱,控制項所可使用屬性、方法...,但改用VS IntelliCode後,可以暢快地享受IntelliSense的大大好處。

2019-08-23

VS Code : 讓pylint 除了錯誤(error)以外,排除顯示(disabled)不影響程式執行的警告(warning)、提示訊息(infomation)的訊息

Pylint的警告(warning)、提示訊息(infomation)等訊息,通常不會影響程式的正常執行,但通常會讓程式碼看起來很不舒服,這些訊息可能包含:

  1. Missing class docstring pylint(missing-docstring)
  2. Found indentation with tabs instead of spaces pylint(mixed-indentation)
  3. Variable name "e1" doesn't conform to snake_case naming style pylint(invalid-name)
  4. No space allowed after bracket pylint(bad-whitespace)
  5. Method could be a function pylint(no-self-use)
  6. Trailing whitespace pylint(trailing-whitespace)
  7. Constant name "win" doesn't conform to UPPER_CASE naming style pylint(invalid-name)
  8.  ...
在VS Code的setting.json加入"python.linting.pylintArgs": ["--errors-only"]

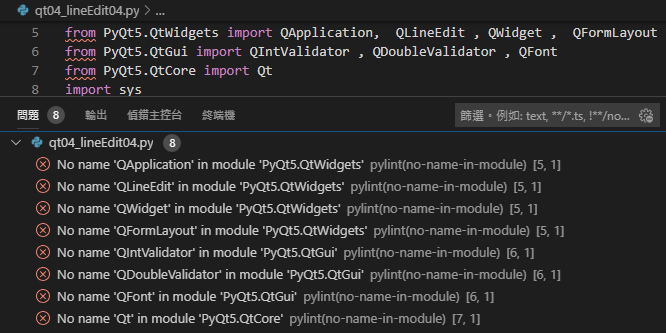
VS Code : pylint 出現錯誤訊息:No name 'QApplication' in module 'PyQt5.QtWidgets',解決方法

  1. 錯誤訊息:No name 'QApplication' in module 'PyQt5.QtWidgets'
  2. 訊息內容:
    {
    "resource": "/d:/MyWorkSpaces/VSWorks/ch04/qt04_lineEdit04.py",
    "owner": "python",
    "code": "no-name-in-module",
    "severity": 8,
    "message": "No name 'QApplication' in module 'PyQt5.QtWidgets'",
    "source": "pylint",
    "startLineNumber": 5,
    "startColumn": 1,
    "endLineNumber": 5,
    "endColumn": 1
    }

  3. 錯誤原因:
    跟所使用的Pylint有關,所採用的版本預設不支援外部擴充模組(Extenions),PyQt5是C++所寫的外部擴充(Extension)。
  4. 解決方法:
    • VS Code : 檔案→喜好設定→設定
    • 在設定的搜尋方塊中輸入:python.linting.pylintArgs
      新增項目,輸入:--extension-pkg-whitelist=PyQt5
    • 設定資料會被寫入:setting.json
    • No name 'QApplication' in module 'PyQt5.QtWidgets' 等模組錯誤的訊息消失了
      from的下曲紅底線,不見了 ...

2019-08-21

Python : 使用PyInstaller把專案程式打包封裝成EXE執行檔

  1. 安裝PyInstaller:
    (base) C:\ProgramData\Anaconda3>pip install PyInstaller
    Collecting PyInstaller
      Downloading https://files.pythonhosted.org/packages/e2/c9/0b44b2ea87ba36395483a672fddd07e6a9cb2b8d3c4a28d7ae76c7e7e1e5/PyInstaller-3.5.tar.gz (3.5MB)
         |████████████████████████████████| 3.5MB 3.3MB/s
      Installing build dependencies ... done
      Getting requirements to build wheel ... done
        Preparing wheel metadata ... done
    Collecting pywin32-ctypes>=0.2.0 (from PyInstaller)
      Downloading https://files.pythonhosted.org/packages/9e/4b/3ab2720f1fa4b4bc924ef1932b842edf10007e4547ea8157b0b9fc78599a/pywin32_ctypes-0.2.0-py2.py3-none-any.whl
    Collecting pefile>=2017.8.1 (from PyInstaller)
      Downloading https://files.pythonhosted.org/packages/36/58/acf7f35859d541985f0a6ea3c34baaefbfaee23642cf11e85fe36453ae77/pefile-2019.4.18.tar.gz (62kB)
         |████████████████████████████████| 71kB 2.3MB/s
    Requirement already satisfied: setuptools in c:\programdata\anaconda3\lib\site-packages (from PyInstaller) (41.0.1)
    Collecting altgraph (from PyInstaller)
      Downloading https://files.pythonhosted.org/packages/0a/cc/646187eac4b797069e2e6b736f14cdef85dbe405c9bfc7803ef36e4f62ef/altgraph-0.16.1-py2.py3-none-any.whl
    Requirement already satisfied: future in c:\programdata\anaconda3\lib\site-packages (from pefile>=2017.8.1->PyInstaller) (0.17.1)
    Building wheels for collected packages: PyInstaller
      Building wheel for PyInstaller (PEP 517) ... done
      Stored in directory: C:\Users\Hannibal\AppData\Local\pip\Cache\wheels\c6\a4\e0\d9a1c5d3d876eb0675171281c293aed80839115e2eb022e6d2
    Successfully built PyInstaller
    Building wheels for collected packages: pefile
      Building wheel for pefile (setup.py) ... done
      Stored in directory: C:\Users\Hannibal\AppData\Local\pip\Cache\wheels\1c\a1\95\4f33011a0c013c872fe6f0f364dc463a2588120820e40a30d8
    Successfully built pefile
    Installing collected packages: pywin32-ctypes, pefile, altgraph, PyInstaller
    Successfully installed PyInstaller-3.5 altgraph-0.16.1 pefile-2019.4.18 pywin32-ctypes-0.2.0
  2. PyInstaller的參數:
    (base) C:\ProgramData\Anaconda3\Scripts>PyInstaller --help
    usage: pyinstaller [-h] [-v] [-D] [-F] [--specpath DIR] [-n NAME]
                       [--add-data <SRC;DEST or SRC:DEST>]
                       [--add-binary <SRC;DEST or SRC:DEST>] [-p DIR]
                       [--hidden-import MODULENAME]
                       [--additional-hooks-dir HOOKSPATH]
                       [--runtime-hook RUNTIME_HOOKS] [--exclude-module EXCLUDES]
                       [--key KEY] [-d {all,imports,bootloader,noarchive}] [-s]
                       [--noupx] [--upx-exclude FILE] [-c] [-w]
                       [-i <FILE.ico or FILE.exe,ID or FILE.icns>]
                       [--version-file FILE] [-m <FILE or XML>] [-r RESOURCE]
                       [--uac-admin] [--uac-uiaccess] [--win-private-assemblies]
                       [--win-no-prefer-redirects]
                       [--osx-bundle-identifier BUNDLE_IDENTIFIER]
                       [--runtime-tmpdir PATH] [--bootloader-ignore-signals]
                       [--distpath DIR] [--workpath WORKPATH] [-y]
                       [--upx-dir UPX_DIR] [-a] [--clean] [--log-level LEVEL]
                       scriptname [scriptname ...]

    positional arguments:
      scriptname            name of scriptfiles to be processed or exactly one
                            .spec-file. If a .spec-file is specified, most options
                            are unnecessary and are ignored.

    optional arguments:
      -h, --help            show this help message and exit
      -v, --version         Show program version info and exit.
      --distpath DIR        Where to put the bundled app (default: .\dist)
      --workpath WORKPATH   Where to put all the temporary work files, .log, .pyz
                            and etc. (default: .\build)
      -y, --noconfirm       Replace output directory (default:
                            SPECPATH\dist\SPECNAME) without asking for confirmation
      --upx-dir UPX_DIR     Path to UPX utility (default: search the execution path)
      -a, --ascii           Do not include unicode encoding support (default:included if available)
      --clean               Clean PyInstaller cache and remove temporary files before building.
      --log-level LEVEL     Amount of detail in build-time console messages. LEVEL
                            may be one of TRACE, DEBUG, INFO, WARN, ERROR,
                            CRITICAL (default: INFO).

    What to generate:
      -D, --onedir          Create a one-folder bundle containing an executable (default)
      -F, --onefile         Create a one-file bundled executable.
      --specpath DIR        Folder to store the generated spec file (default: current directory)
      -n NAME, --name NAME  Name to assign to the bundled app and spec file
                            (default: first script's basename)

    What to bundle, where to search:
      --add-data <SRC;DEST or SRC:DEST>
                            Additional non-binary files or folders to be added to
                            the executable. The path separator is platform
                            specific, ``os.pathsep`` (which is ``;`` on Windows
                            and ``:`` on most unix systems) is used. This option
                            can be used multiple times.
      --add-binary <SRC;DEST or SRC:DEST>
                            Additional binary files to be added to the executable.
                            See the ``--add-data`` option for more details. This
                            option can be used multiple times.
      -p DIR, --paths DIR   A path to search for imports (like using PYTHONPATH).
                            Multiple paths are allowed, separated by ';', or use
                            this option multiple times
      --hidden-import MODULENAME, --hiddenimport MODULENAME
                            Name an import not visible in the code of the
                            script(s). This option can be used multiple times.
      --additional-hooks-dir HOOKSPATH
                            An additional path to search for hooks. This option
                            can be used multiple times.
      --runtime-hook RUNTIME_HOOKS
                            Path to a custom runtime hook file. A runtime hook is
                            code that is bundled with the executable and is
                            executed before any other code or module to set up
                            special features of the runtime environment. This
                            option can be used multiple times.
      --exclude-module EXCLUDES
                            Optional module or package (the Python name, not the
                            path name) that will be ignored (as though it was not
                            found). This option can be used multiple times.
      --key KEY             The key used to encrypt Python bytecode.

    How to generate:
      -d {all,imports,bootloader,noarchive}, --debug {all,imports,bootloader,noarchive}
                            Provide assistance with debugging a frozen
                            application. This argument may be provided multiple
                            times to select several of the following options.
                            - all: All three of the following options.
                            - imports: specify the -v option to the underlying
                              Python interpreter, causing it to print a message
                              each time a module is initialized, showing the
                              place (filename or built-in module) from which it
                              is loaded. See
                              https://docs.python.org/3/using/cmdline.html#id4.
                            - bootloader: tell the bootloader to issue progress
                              messages while initializing and starting the
                              bundled app. Used to diagnose problems with
                              missing imports.
                            - noarchive: instead of storing all frozen Python
                              source files as an archive inside the resulting
                              executable, store them as files in the resulting
                              output directory.
      -s, --strip           Apply a symbol-table strip to the executable and
                            shared libs (not recommended for Windows)
      --noupx               Do not use UPX even if it is available (works
                            differently between Windows and *nix)
      --upx-exclude FILE    Prevent a binary from being compressed when using upx.
                            This is typically used if upx corrupts certain
                            binaries during compression. FILE is the filename of
                            the binary without path. This option can be used
                            multiple times.

    Windows and Mac OS X specific options:
      -c, --console, --nowindowed
                            Open a console window for standard i/o (default).
    On
                            Windows this option will have no effect if the first
                            script is a '.pyw' file.
      -w, --windowed, --noconsole
                            Windows and Mac OS X: do not provide a console window
                            for standard i/o. On Mac OS X this also triggers
                            building an OS X .app bundle. On Windows this option
                            will be set if the first script is a '.pyw' file. This
                            option is ignored in *NIX systems.
      -i <FILE.ico or FILE.exe,ID or FILE.icns>, --icon <FILE.ico or FILE.exe,ID or FILE.icns>
                            FILE.ico: apply that icon to a Windows executable.
                            FILE.exe,ID, extract the icon with ID from an exe.
                            FILE.icns: apply the icon to the .app bundle on Mac OS X

    Windows specific options:
      --version-file FILE   add a version resource from FILE to the exe
      -m <FILE or XML>, --manifest <FILE or XML>
                            add manifest FILE or XML to the exe
      -r RESOURCE, --resource RESOURCE
                            Add or update a resource to a Windows executable. The
                            RESOURCE is one to four items,
                            FILE[,TYPE[,NAME[,LANGUAGE]]]. FILE can be a data file
                            or an exe/dll. For data files, at least TYPE and NAME
                            must be specified. LANGUAGE defaults to 0 or may be
                            specified as wildcard * to update all resources of the
                            given TYPE and NAME. For exe/dll files, all resources
                            from FILE will be added/updated to the final
                            executable if TYPE, NAME and LANGUAGE are omitted or
                            specified as wildcard *.This option can be used
                            multiple times.
      --uac-admin           Using this option creates a Manifest which will
                            request elevation upon application restart.
      --uac-uiaccess        Using this option allows an elevated application to
                            work with Remote Desktop.

    Windows Side-by-side Assembly searching options (advanced):
      --win-private-assemblies
                            Any Shared Assemblies bundled into the application
                            will be changed into Private Assemblies. This means
                            the exact versions of these assemblies will always be
                            used, and any newer versions installed on user
                            machines at the system level will be ignored.
      --win-no-prefer-redirects
                            While searching for Shared or Private Assemblies to
                            bundle into the application, PyInstaller will prefer
                            not to follow policies that redirect to newer
                            versions, and will try to bundle the exact versions of
                            the assembly.

    Mac OS X specific options:
      --osx-bundle-identifier BUNDLE_IDENTIFIER
                            Mac OS X .app bundle identifier is used as the default
                            unique program name for code signing purposes. The
                            usual form is a hierarchical name in reverse DNS
                            notation. For example:
                            com.mycompany.department.appname (default: first
                            script's basename)

    Rarely used special options:
      --runtime-tmpdir PATH
                            Where to extract libraries and support files in
                            `onefile`-mode. If this option is given, the
                            bootloader will ignore any temp-folder location
                            defined by the run-time OS. The ``_MEIxxxxxx``-folder
                            will be created here. Please use this option only if
                            you know what you are doing.
      --bootloader-ignore-signals
                            Tell the bootloader to ignore signals rather than
                            forwarding them to the child process. Useful in
                            situations where e.g. a supervisor process signals
                            both the bootloader and child (e.g. via a process
                            group) to avoid signalling the child twice.
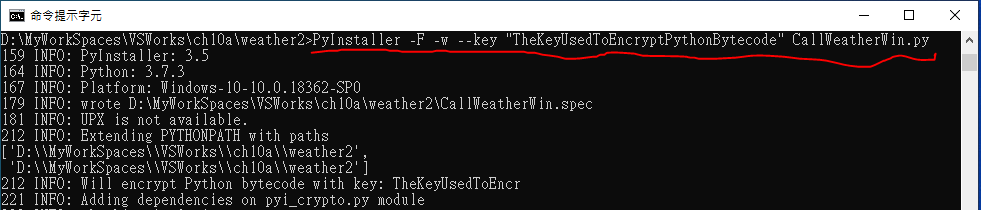
  3. 打包封裝的範例
    PyInstaller -F -w --key "TheKeyUsedToEncryptPythonBytecode" CallWeatherWin.py
    -F:打包封裝成一個執行檔 (-D:打包封裝成一個目錄)
    -w:這是一個視窗程式(window),不是主控台程式(console)
    --key:程式碼封裝加密的金鑰
    打包封裝的結果放在dist目錄內。打包的執行檔只能在原相同作業系統下執行(64位元/32位元是有區分的)

    D:\MyWorkSpaces\VSWorks\ch10a\weather2>PyInstaller -F -w --key "TheKeyUsedToEncryptPythonBytecode" CallWeatherWin.py
    159 INFO: PyInstaller: 3.5
    164 INFO: Python: 3.7.3
    167 INFO: Platform: Windows-10-10.0.18362-SP0
    179 INFO: wrote D:\MyWorkSpaces\VSWorks\ch10a\weather2\CallWeatherWin.spec
    181 INFO: UPX is not available.
    212 INFO: Extending PYTHONPATH with paths
    ['D:\\MyWorkSpaces\\VSWorks\\ch10a\\weather2',
    'D:\\MyWorkSpaces\\VSWorks\\ch10a\\weather2']
    212 INFO: Will encrypt Python bytecode with key: TheKeyUsedToEncr
    221 INFO: Adding dependencies on pyi_crypto.py module
    223 INFO: checking Analysis
    223 INFO: Building Analysis because Analysis-00.toc is non existent
    224 INFO: Initializing module dependency graph...
    236 INFO: Initializing module graph hooks...
    251 INFO: Analyzing base_library.zip ...
    13714 INFO: Analyzing hidden import 'Crypto.Cipher._AES'
    14066 INFO: running Analysis Analysis-00.toc
    14107 INFO: Adding Microsoft.Windows.Common-Controls to dependent assemblies of final executable
    required by c:\programdata\anaconda3\python.exe
    14779 INFO: Caching module hooks...
    14811 INFO: Analyzing D:\MyWorkSpaces\VSWorks\ch10a\weather2\CallWeatherWin.py
    16113 INFO: Processing pre-safe import module hook urllib3.packages.six.moves
    20871 INFO: Processing pre-safe import module hook six.moves
    25919 INFO: Loading module hooks...
    25920 INFO: Loading module hook "hook-certifi.py"...
    25927 INFO: Loading module hook "hook-Crypto.py"...
    Traceback (most recent call last):
    File "", line 2, in
    ModuleNotFoundError: No module named 'Crypto.Math'
    26049 INFO: Loading module hook "hook-cryptography.py"...
    26814 INFO: Loading module hook "hook-encodings.py"...
    26983 INFO: Loading module hook "hook-pydoc.py"...
    26987 INFO: Loading module hook "hook-PyQt5.py"...
    27509 INFO: Loading module hook "hook-PyQt5.QtCore.py"...
    27678 INFO: Loading module hook "hook-PyQt5.QtGui.py"...
    28090 INFO: Loading module hook "hook-PyQt5.QtWidgets.py"...
    28761 INFO: Loading module hook "hook-xml.py"...
    29119 INFO: Looking for ctypes DLLs
    29157 INFO: Analyzing run-time hooks ...
    29165 INFO: Including run-time hook 'pyi_rth_certifi.py'
    29177 INFO: Including run-time hook 'pyi_rth_pyqt5.py'
    29202 INFO: Looking for dynamic libraries
    32584 INFO: Looking for eggs
    32585 INFO: Using Python library c:\programdata\anaconda3\python37.dll
    32586 INFO: Found binding redirects:
    []
    32606 INFO: Warnings written to D:\MyWorkSpaces\VSWorks\ch10a\weather2\build\CallWeatherWin\warn-CallWeatherWin.txt
    32762 INFO: Graph cross-reference written to D:\MyWorkSpaces\VSWorks\ch10a\weather2\build\CallWeatherWin\xref-CallWeatherWin.html
    32848 INFO: checking PYZ
    32848 INFO: Building PYZ because PYZ-00.toc is non existent
    32850 INFO: Building PYZ (ZlibArchive) D:\MyWorkSpaces\VSWorks\ch10a\weather2\build\CallWeatherWin\PYZ-00.pyz
    34987 INFO: Building PYZ (ZlibArchive) D:\MyWorkSpaces\VSWorks\ch10a\weather2\build\CallWeatherWin\PYZ-00.pyz completed successfully.
    35048 INFO: checking PKG
    35050 INFO: Building PKG because PKG-00.toc is non existent
    35050 INFO: Building PKG (CArchive) PKG-00.pkg
    35731 WARNING: One binary added with two internal names.
    35732 WARNING: ('libGLESv2.dll',
    'C:\\programdata\\anaconda3\\lib\\site-packages\\PyQt5\\Qt\\bin\\libGLESv2.dll',
    'BINARY')
    35733 WARNING: was placed previously at
    35735 WARNING: ('PyQt5\\Qt\\bin\\libGLESv2.dll',
    'C:\\programdata\\anaconda3\\lib\\site-packages\\PyQt5\\Qt\\bin\\libGLESv2.dll',
    'BINARY')
    60664 INFO: Building PKG (CArchive) PKG-00.pkg completed successfully.
    60689 INFO: Bootloader c:\programdata\anaconda3\lib\site-packages\PyInstaller\bootloader\Windows-64bit\runw.exe
    60690 INFO: checking EXE
    60691 INFO: Building EXE because EXE-00.toc is non existent
    60693 INFO: Building EXE from EXE-00.toc
    60696 INFO: Appending archive to EXE D:\MyWorkSpaces\VSWorks\ch10a\weather2\dist\CallWeatherWin.exe
    61113 INFO: Building EXE from EXE-00.toc completed successfully.

2019-08-17

讓在Anaconda Navigator環境下安裝執行的Visual Studio Code增加PYQT Integration的擴充功能

  1. 在Visual Studio Code安裝PYQT Integration的擴充功能
  2. 安裝PYQT Integration擴充功能後,將會增加下列功能,或更多,例如:
    從VS code直接開啟 designer.exe 新增 ui form,在VS Code下預覽 ui form ...

    PYQT: New FormOpen designer
    PYQT: Edit In DesignerOpen designer with current ui form
    PYQT: PreviewPreview current ui form
    PYQT: Compile FormCompile ui form to path defined in "pyqt-integration.pyuic.compile.filepath"
    PYQT: Compile ResourceCompile qrc file to path defined in "pyqt-integration.pyrcc.compile.filepath"
    PYQT: Generate Translation File (.ts)Compile UI file (.py) to translation file with path defined in "pyqt-integration.pylupdate.compile.filepath"
    Compile .pro file
    PYQT: Open With Qt LinguistOpen with Qt Linguist for translation file (.ts)
  3. 如果從 VS Code,無法正常啟動 designer.exe 或 pyuic5 ...,可以透過擴充延伸模組設定,指定正確的路徑、檔名 ...
  4. 以Qtdesigner這個設定項目為例,designer.exe,通常都是放在,Anaconda3安裝目錄的\Lib\site-packages\pyqt5_tools\路徑下。
  5. 設定項目的參考資料:
    pyqt-integration.qtdesigner.pathPath of executable file of qt designer, the extension will ask you to set at the first time it runs, e.g. c:\\Users\\username\\AppData\\Local\\Programs\\Python\\Python35\\Lib\\site-packages\\pyqt5-tools\\designer.exe
    pyqt-integration.pyuic.cmd"pyuic" command, default "pyuic5"
    pyqt-integration.pyuic.compile.filepathCompile file path, relative path as default, switch to absolute path by involving ${workspace}, e.g. ${workspace}\\UI\\Ui_${ui_name}.py
    pyqt-integration.pyuic.compile.addOptionsAdditional options for pyuic compiling, it can be a combination of '-x', '-d', '-i', etc.
    pyqt-integration.pyrcc.cmd"pyrcc" command, default "pyrcc5"
    pyqt-integration.pyrcc.compile.filepathCompile file path, relative path as default, switch to absolute path by involving ${workspace}, e.g. ${workspace}\\QRC\\${qrc_name}_rc.py
    pyqt-integration.pyrcc.compile.addOptionsAdditional options for pyrcc compiling, it can be a combination of '-root', '-threshold', '-compress', '-no-compress', etc.
    pyqt-integration.pylupdate.cmd"pylupdate" command, default "pylupdate5"
    pyqt-integration.pylupdate.compile.filepathOnly works when compiling an UI file (.py), Stores the target '.ts' file's path, relative path as default, switch to absolute path by involving ${workspace}, e.g. ${workspace}\\TS\\${ts_name}.ts
    pyqt-integration.pylupdate.compile.addOptionsAdditional options for pylupdate, it can be a combination of '-verbose', '-noobsolete', '-tr-function', '-translate-function', etc.
    pyqt-integration.linguist.cmd"linguist" command, default "linguist"

2019-08-15

Python 3 : SQLite3的存取基本步驟,及異常錯誤處理 (try ... except ... )

  1. 參考資料:
  2. 在Python 3 環境下,使用SQLilte3,對資料庫操作的基本步驟(一般原則):
    1. 用sqlite3.connect("資料庫檔名.副檔名") 建立資料庫連線,並將這個連線物件指定給一個連線物件變數,例如:oConn=sqlite3.connect("資料庫檔名.副檔名")
    2. 建立連線物件的cursor物件,例如:cTest=oConn.cursor()  
    3. 執行SQL命令,將結果以tuple資料組存放在cursor物件內。例如:cTest.execute("SQL命令")  
    4. 取得目標資料集,例如:oTest=cTest.fetchall()  
    5. 處理取得的資料集,例如:for aTest in oTest :
    6. 關閉資料庫連線,例如:oConn.close()  
  3. 對於不需要return回傳執行結果的資料庫操作,可以簡化操作步驟,如下:
    1. 建立資料庫連線,例如:oConn=sqlite3.connect("資料庫檔名.副檔名")
    2. 執行SQL命令,例如:oConn.execute("SQL命令")  
    3. 更新資料庫,例如:oConn.commite()  
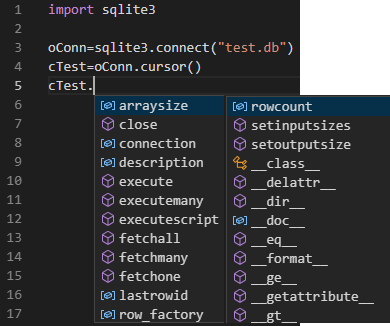
  4. cursor物件是一個指標物件,cursor物件執行SQL命令後,會將結果存放在cursor物件內,並可透過fetchone, fetchmany, fetchall ... 等方法或函數來操作cursor物件內的資料。
    一個資料庫連線的使用過程,可以根據目的需求的不同,建立多個cursor物件來使用,不同名稱的cursor物件,如果不再使用可給予關閉close()。同一個cursor物件,可以透過不同的命令執行,賦予不同的資料內容。
    使用VS code 可以快速瀏覽sqlite3 cursor可以使用的方法、屬性...
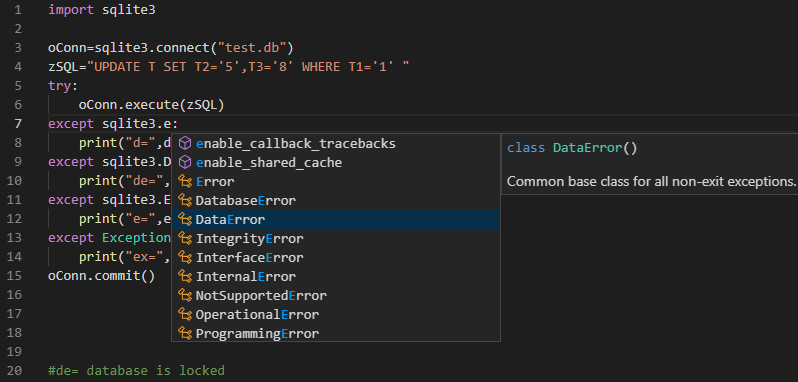
  5. 可以使用 VS Code,查看Python 有哪些處理 SQLite 錯誤例外異常的類別,例如;Error, DatabaseErrot, DataError, ProgrammingError ...,在不分開測試錯誤類別來源的情況下,可以使用預設的異常錯誤例外處理 Exception ...
    import sqlite3
    oConn=sqlite3.connect("test.db")
    zSQL="UPDATE T SET T2='5',T3='8' WHERE T1='1' "
    try:
        oConn.execute(zSQL)
    except sqlite3.DataError as d:
        print("d=",d)
    except sqlite3.DatabaseError as de:
        print("de=",de)
    except sqlite3.Error as e:
        print("e=",e)
    except Exception as ex:
        print("ex=",ex)
    oConn.commit()

    #de= database is locked

  6. 適度地在SQLite的CRUD操作上使用try ... except ...,可以確保程式持續執行,或在執行過程排除異常、錯誤...。

2019-08-13

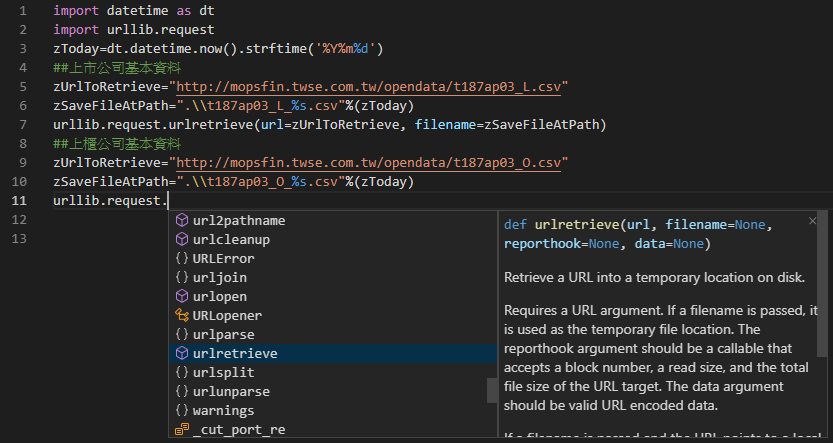
Python 3 : 使用 urllib.request.retrieve 下載檔案

import datetime as dt
import urllib.request
zToday=dt.datetime.now().strftime('%Y%m%d')
##上市公司基本資料
zUrlToRetrieve="http://mopsfin.twse.com.tw/opendata/t187ap03_L.csv"
zSaveFileAtPath=".\\t187ap03_L_%s.csv"%(zToday)
urllib.request.urlretrieve(url=zUrlToRetrieve, filename=zSaveFileAtPath)
##上櫃公司基本資料
zUrlToRetrieve="http://mopsfin.twse.com.tw/opendata/t187ap03_O.csv"
zSaveFileAtPath=".\\t187ap03_O_%s.csv"%(zToday)
urllib.request.urlretrieve(zUrlToRetrieve, zSaveFileAtPath)

##下載後,遇有存檔相同檔名的檔案,會覆蓋較舊的檔案