站內搜尋:Yahoo搜尋的結果,如果沒有給完整的網址,請在站內再搜尋一次!

顯示具有 PyQt5 標籤的文章。 顯示所有文章

2021-09-20

Python : 安裝 pyqt5-tools 取得 PyQt5的 UI 介面設計工具 designer.exe

 習慣使用PyCharm 管理Python套件模組的虛擬環境,一個專案就建立一個虛擬環境,對專案而言,簡單又簡化。

安裝PyQt5時,並沒有模組關聯將pyqt5-tools一 倂安裝,因此要使用designer.exe來輔助設計UI介面時,會找不到designer.exe,因此要安裝一下pyqt5-tools (PyQt5 Designer and QML plugins)。

安裝後可以在以下位置找到designer.exe:

專案目錄位置的\venv\Lib\site-packages\qt5_applications\Qt\bin


2020-12-25

如何在Linux Ubuntu Desktop安裝Qt Designer,用來設計python GUI使用者介面程式

ubuntu的版本:20.04.1 (LTS) 1. 確認python3已可以work

2. 安裝PyQt5
sudo apt-get install python3-pyqt5

3. 安裝Qt Designer
sudo apt-get install qttools5-dev-tools
sudo apt-get install qttools5-dev

4. 啟動Qt Designer
cd /usr/lib/x86_64-linux-gnu/qt5/bin
./designer

5. 將透過Qt Designer設計的ui檔,轉換匯出為py檔
pyuic5 /home/userid/workfolder/helloworld.ui -o helloworld.py

如果出現 Command 'pyuic5' not found, but can be installed with:
可以使用以下指令安裝pyuic5 sudo apt install pyqt5-dev-tools

2019-08-23

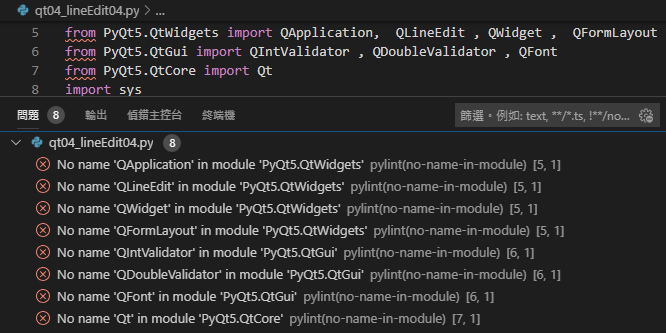
VS Code : pylint 出現錯誤訊息:No name 'QApplication' in module 'PyQt5.QtWidgets',解決方法

  1. 錯誤訊息:No name 'QApplication' in module 'PyQt5.QtWidgets'
  2. 訊息內容:
    {
    "resource": "/d:/MyWorkSpaces/VSWorks/ch04/qt04_lineEdit04.py",
    "owner": "python",
    "code": "no-name-in-module",
    "severity": 8,
    "message": "No name 'QApplication' in module 'PyQt5.QtWidgets'",
    "source": "pylint",
    "startLineNumber": 5,
    "startColumn": 1,
    "endLineNumber": 5,
    "endColumn": 1
    }

  3. 錯誤原因:
    跟所使用的Pylint有關,所採用的版本預設不支援外部擴充模組(Extenions),PyQt5是C++所寫的外部擴充(Extension)。
  4. 解決方法:
    • VS Code : 檔案→喜好設定→設定
    • 在設定的搜尋方塊中輸入:python.linting.pylintArgs
      新增項目,輸入:--extension-pkg-whitelist=PyQt5
    • 設定資料會被寫入:setting.json
    • No name 'QApplication' in module 'PyQt5.QtWidgets' 等模組錯誤的訊息消失了
      from的下曲紅底線,不見了 ...

2019-08-17

讓在Anaconda Navigator環境下安裝執行的Visual Studio Code增加PYQT Integration的擴充功能

  1. 在Visual Studio Code安裝PYQT Integration的擴充功能
  2. 安裝PYQT Integration擴充功能後,將會增加下列功能,或更多,例如:
    從VS code直接開啟 designer.exe 新增 ui form,在VS Code下預覽 ui form ...

    PYQT: New FormOpen designer
    PYQT: Edit In DesignerOpen designer with current ui form
    PYQT: PreviewPreview current ui form
    PYQT: Compile FormCompile ui form to path defined in "pyqt-integration.pyuic.compile.filepath"
    PYQT: Compile ResourceCompile qrc file to path defined in "pyqt-integration.pyrcc.compile.filepath"
    PYQT: Generate Translation File (.ts)Compile UI file (.py) to translation file with path defined in "pyqt-integration.pylupdate.compile.filepath"
    Compile .pro file
    PYQT: Open With Qt LinguistOpen with Qt Linguist for translation file (.ts)
  3. 如果從 VS Code,無法正常啟動 designer.exe 或 pyuic5 ...,可以透過擴充延伸模組設定,指定正確的路徑、檔名 ...
  4. 以Qtdesigner這個設定項目為例,designer.exe,通常都是放在,Anaconda3安裝目錄的\Lib\site-packages\pyqt5_tools\路徑下。
  5. 設定項目的參考資料:
    pyqt-integration.qtdesigner.pathPath of executable file of qt designer, the extension will ask you to set at the first time it runs, e.g. c:\\Users\\username\\AppData\\Local\\Programs\\Python\\Python35\\Lib\\site-packages\\pyqt5-tools\\designer.exe
    pyqt-integration.pyuic.cmd"pyuic" command, default "pyuic5"
    pyqt-integration.pyuic.compile.filepathCompile file path, relative path as default, switch to absolute path by involving ${workspace}, e.g. ${workspace}\\UI\\Ui_${ui_name}.py
    pyqt-integration.pyuic.compile.addOptionsAdditional options for pyuic compiling, it can be a combination of '-x', '-d', '-i', etc.
    pyqt-integration.pyrcc.cmd"pyrcc" command, default "pyrcc5"
    pyqt-integration.pyrcc.compile.filepathCompile file path, relative path as default, switch to absolute path by involving ${workspace}, e.g. ${workspace}\\QRC\\${qrc_name}_rc.py
    pyqt-integration.pyrcc.compile.addOptionsAdditional options for pyrcc compiling, it can be a combination of '-root', '-threshold', '-compress', '-no-compress', etc.
    pyqt-integration.pylupdate.cmd"pylupdate" command, default "pylupdate5"
    pyqt-integration.pylupdate.compile.filepathOnly works when compiling an UI file (.py), Stores the target '.ts' file's path, relative path as default, switch to absolute path by involving ${workspace}, e.g. ${workspace}\\TS\\${ts_name}.ts
    pyqt-integration.pylupdate.compile.addOptionsAdditional options for pylupdate, it can be a combination of '-verbose', '-noobsolete', '-tr-function', '-translate-function', etc.
    pyqt-integration.linguist.cmd"linguist" command, default "linguist"

2019-08-02

在Anaconda3環境下安裝eric6 (The Eric Python IDE, v19.7),spyder也可以繼續正常使用

安裝Eric6 v19.7 前的環境:
  • Anaconda3 -2019.07 ( https://www.anaconda.com/distribution/#windows )
  • 已在Anaconda3環境下使用的Applications:Spyder(v3.3.6),  Jupyter Notebook(v6.0.0), Visual Studio Code(v1.36.1)。已安裝QtPy模組(v1.8.0)(QtPy provides support for PyQt5, PyQt4, PySide2 and PySide using the Qt5 layout (where the QtGui module has been split into QtGui and QtWidgets). https://pypi.org/project/QtPy/ )
  • Thonny (v3.1.2)。已安裝 pyqt5-tools模組(這個模組對pyqt5的版本需求是5.11.3)
在Anaconda3環境下安裝Eric6會失敗,主要是pyqt5已安裝版本,在有需求的Applications間的差異問題,修正pyqt5的安裝版本,即可順利安裝eric6。( https://eric-ide.python-projects.org/eric-download.html )

安裝過程,說明如下:
  1. 就按照Eric6網站上的安裝說明,取得最新版本
    https://sourceforge.net/projects/eric-ide/files/eric6/stable/19.07/eric6-19.7.zip/download 
  2. 將zip解壓縮至:Anaconda3安裝路徑下的以下位置:
    C:\ProgramData\Anaconda3\Lib\site-packages
  3. 以系統管理員身分,開啟Anaconda Prompt,切換至eric6解壓縮後的目錄下
    C:\ProgramData\Anaconda3\Lib\site-packages\eric6-19.7
  4. 安裝 eric6
    (base) C:\ProgramData\Anaconda3\Lib\site-packages\eric6-19.7>python install.py install
    Checking dependencies
    Python Version: 3.7.3
    Found PyQt5
    Found pyuic5
    QScintilla could not be detected.
    Error: cannot import name 'Qsci' from 'PyQt5' (C:\ProgramData\Anaconda3\lib\site-packages\PyQt5\__init__.py)

    Shall 'QScintilla' be installed using pip? (Y/n) Y
    Collecting QScintilla
      Downloading https://files.pythonhosted.org/packages/52/1a/ce7875f433fd0aa1d3774609586f77d78ff0524790942cca95e1d13a7ac7/QScintilla-2.11.2-5.12.4-cp35.cp36.cp37.cp38-none-win_amd64.whl (2.0MB)
    ...
    Collecting PyQt5>=5.10.1 (from QScintilla)
      Downloading https://files.pythonhosted.org/packages/3b/d3/76670a331935f58f9a2ebd53c6e9b670bbf15c458fa6993500af5d323160/PyQt5-5.13.0-5.13.0-cp35.cp36.cp37.cp38-none-win_amd64.whl (49.7MB)
    ...
    Collecting PyQt5_sip<13,>=4.19.14 (from PyQt5>=5.10.1->QScintilla)
      Downloading https://files.pythonhosted.org/packages/cf/c8/1e9eda4ba09a84fc528d4c87001de2d7a8cbbe04c2a834af3eb81a0ecd88/PyQt5_sip-4.19.18-cp37-none-win_amd64.whl (51kB)
    ...
    ERROR: spyder 3.3.6 requires pyqtwebengine<5.13; python_version >= "3", which is not installed.
    ERROR: spyder 3.3.6 has requirement pyqt5<5.13; python_version >= "3", but you'll have pyqt5 5.13.0 which is incompatible.

    Installing collected packages: PyQt5-sip, PyQt5, QScintilla

    ERROR: Could not install packages due to an EnvironmentError: [WinError 5] 存取被拒。: 'C:\\ProgramData\\Anaconda3\\Lib\\site-packages\\PyQt5\\QtCore.pyd'
    Consider using the `--user` option or check the permissions.


    Sorry, please install QScintilla2 and
    its PyQt5/PyQt4 wrapper.
    Error: QScintilla could not be installed.

    Press enter to continue...
  5. eric6安裝發生錯誤的原因:
    安裝eric6需要安裝QScintilla,需要PyQt5 5.10.1 以上的版本,系統自動收集安裝了 pyqt5 5.13.0的版本。
    但已安裝的spyder 3.3.6 限制 pyqt5 必須是 v5.13以下 (<5.13)
  6. 重新安裝pyqt5-tools,並指定安裝版本為 5.11.3
    (base) C:\ProgramData\Anaconda3>pip install pyqt5==5.11.3
    Collecting pyqt5==5.11.3
      Downloading https://files.pythonhosted.org/packages/a7/2d/d2c989006c86ae98ed230c28c3e0dd7fa0374e723afc107d12268159ceb7/PyQt5-5.11.3-5.11.2-cp35.cp36.cp37.cp38-none-win_amd64.whl (93.4MB)
    ...
    ERROR: spyder 3.3.6 requires pyqtwebengine<5.13; python_version >= "3", which is not installed.
    Installing collected packages: pyqt5
    Successfully installed pyqt5-5.11.3
  7. 安裝pyqt5-tools
    (base) C:\ProgramData\Anaconda3>pip install pyqt5-tools
    Collecting pyqt5-tools
      Downloading https://files.pythonhosted.org/packages/6a/35/98279ba706e9c3731f0f53813e9a8152ed662f2230e8af18a20d490167be/pyqt5_tools-5.11.3.1.4-cp37-none-win_amd64.whl (59.4MB)
    ...
    Requirement already satisfied: pyqt5==5.11.3 in c:\programdata\anaconda3\lib\site-packages (from pyqt5-tools) (5.11.3)
    Requirement already satisfied: click in c:\programdata\anaconda3\lib\site-packages (from pyqt5-tools) (7.0)
    Collecting python-dotenv (from pyqt5-tools)
      Downloading https://files.pythonhosted.org/packages/57/c8/5b14d5cffe7bb06bedf9d66c4562bf90330d3d35e7f0266928c370d9dd6d/python_dotenv-0.10.3-py2.py3-none-any.whl
    Requirement already satisfied: PyQt5_sip<4.20,>=4.19.11 in c:\programdata\anaconda3\lib\site-packages (from pyqt5==5.11.3->pyqt5-tools) (4.19.18)
    Installing collected packages: python-dotenv, pyqt5-tools
    Successfully installed pyqt5-tools-5.11.3.1.4 python-dotenv-0.10.3

  8. 安裝 eric6
    (base) C:\ProgramData\Anaconda3\Lib\site-packages\eric6-19.7>python install.py install
    Checking dependencies
    Python Version: 3.7.3
    Found PyQt5
    Found pyuic5
    QScintilla could not be detected.
    Error: cannot import name 'Qsci' from 'PyQt5' (C:\ProgramData\Anaconda3\lib\site-packages\PyQt5\__init__.py)

    Shall 'QScintilla' be installed using pip? (Y/n) Y
    Collecting QScintilla
      Using cached https://files.pythonhosted.org/packages/52/1a/ce7875f433fd0aa1d3774609586f77d78ff0524790942cca95e1d13a7ac7/QScintilla-2.11.2-5.12.4-cp35.cp36.cp37.cp38-none-win_amd64.whl
    Requirement already satisfied: PyQt5>=5.10.1 in c:\programdata\anaconda3\lib\site-packages (from QScintilla) (5.11.3)
    Requirement already satisfied: PyQt5_sip<4.20,>=4.19.11 in c:\programdata\anaconda3\lib\site-packages (from PyQt5>=5.10.1->QScintilla) (4.19.18)
    Installing collected packages: QScintilla
    Successfully installed QScintilla-2.11.2
    Found QScintilla2
    Found QtGui
    Found QtNetwork
    Found QtPrintSupport
    Found QtSql
    Found QtSvg
    Found QtWidgets
    Found QtWebEngineWidgets
    Qt Version: 5.11.2
    sip Version: 4.19.18
    PyQt Version: 5.11.3
    QScintilla Version: 2.11.2
    All dependencies ok.
    Cleaning up old installation ...
    Creating configuration file ...
    Compiling user interface files ...
    Compiling source files ...
    Installing eric6 ...
    Installing Python API files to 'C:/ProgramData/Anaconda3/lib/site-packages/PyQt5/Qt\qsci\api\python'.
    Installing Ruby API files to 'C:/ProgramData/Anaconda3/lib/site-packages/PyQt5/Qt\qsci\api\ruby'.
    Installing QSS API files to 'C:/ProgramData/Anaconda3/lib/site-packages/PyQt5/Qt\qsci\api\qss'.
    Installation complete.
    Press enter to continue...
  9. 安裝 eric6 成功
    • 確認可以啟動 spyder
    • 確認可以啟動designer.exe
    • 確認可以啟動 eric6

2019-07-26

在Thonny安裝PyQt5 及 pyqt5-tools 建立python開發視窗程式的環境


  1. Thonny的官網(Python IDE for beginners):https://thonny.org/ 
  2. 下載取得Thonny:https://github.com/thonny/thonny/releases/tag/v3.1.2  
  3. 要安裝的環境:Win 10 home ,已安裝Anaconda3,並已在環境變數的系統變數Path中,設定在Anaconda3中執行Python相關程式的相關路徑:
    C:\ProgramData\Anaconda3
    C:\ProgramData\Anaconda3\Library\mingw-w64\bin
    C:\ProgramData\Anaconda3\Library\usr\bin
    C:\ProgramData\Anaconda3\Library\bin
    C:\ProgramData\Anaconda3\Scripts
  4. 因為Thonny的安裝,包含獨立專屬的Python,因此不會使用到Anaconda的Python版本
  5. 在Thonny安裝Python視窗程式開發環境的步驟:
    1. Tools → Manage packages...
    2. 在文字方塊中輸入:PyQt5 → 『Find package from PyPi』
    3. 安裝PyQt5,按下『Install』
    4. 完成安裝。已安裝的模組已包含PyQt5,這次安裝的版本是 5.13.0
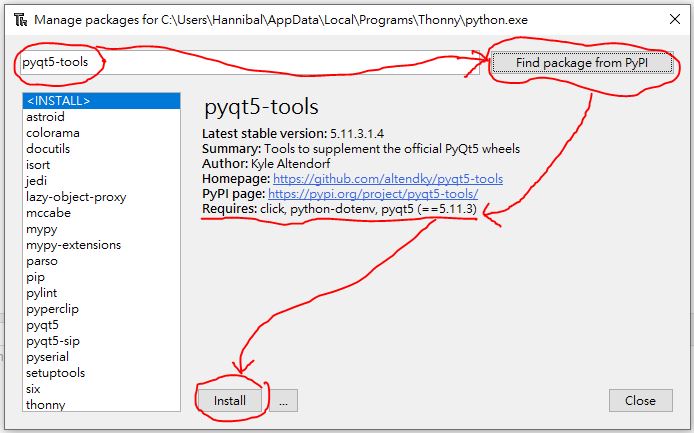
    5. 準備安裝pyqt5-tools,安裝pyqt5-tools的需求是必須在安裝click及python-dotenv,pyqt5必須是5.11.3版。
      不管目前是否符合安裝pyqt5-tools,還是按下『Install』
    6. pyqt5-tools完成安裝。
      確認已自動安裝click, python-dotenv模組。
      pyqt5的版本一自動調整為5.11.3版。
    7. 確認一下pyqt5-tools是否安裝成功?
      使用以下程式碼,測試視窗程式是否OK?
      import sys
      from PyQt5 import QtWidgets, QtCore
      oApp=QtWidgets.QApplication(sys.argv)
      oWidget=QtWidgets.QWidget()
      oWidget.resize(250,100)
      oWidget.setWindowTitle("Hello PyQt5")
      oWidget.show()
      sys.exit(oApp.exec_())
    8. pyqt5-tools的安裝位置是:
      C:\Users\Hannibal\AppData\Roaming\Python\Python37\site-packages
      把 C:\Users\Hannibal\AppData\Roaming\Python\Python37\site-packages\pyqt5_tools\designer.exe 的捷徑,建立在桌面上,以便開啟UI設計的程式。
  6. 當Anaconda3 和 Thonny同時安裝時,不管哪一個先安裝,在Thonny透過 Tools → Manage packages...安裝模組後,在漫遊目錄下的Python目錄,會導致Anaconda3 Navigator、spyder...等程式無法執行,解決的方法:
    將漫遊目錄: C:\Users\Hannibal(使用者代號)\AppData\Roaming 下的 Python目錄改名,例如:PythonXXX,下一次要用Thonny時,再將目錄名稱改回。
  7. Thonny的PyQt5及pyqt5-tools模組安裝OK後,再加上pyqt5-tools所提供的designer.exe,就可以進入另一階段的Python視窗程式設計了...
    Thonny處裡程式碼(codes),UI介面設計由designer.exe負責,MVC的味道跑出來了 ...